Tutorial: How to use Wall and Basement Tools in Sims 4
Directions, illustrations, video, tips & tricks for the Sim 4 builder
Learn to make rooms with the Wall Tool, the Room Tool, the Diagonal Room Tool, how to create basements with the Basement Tool or Custom Basement Tool, and how to Build a Ceiling if it’s missing. Learn about Wall Height, Half Walls, Friezes & Exterior Trim, Spandrels & Wall Sculptures, and more.

Learn to build in Sims 4!
Where to find “Walls and Empty Rooms” in Build Mode:
- See in Tutorial Video | see minute: 00:00
- Click on the wall next to the door

How To Use Minute Notations & Links to Tutorial Video
- Minute links open on YouTube in new tab at that part in the video.
- It’s the same video as the video on this page.
- If you want to stay on this page, go to the video on this page to the minute listed to view each item below. (Instead of clicking on the minute link.)
Wall Tool
- Wall Tool in Tutorial Video | see minute: 00:22
- Wall Tool in Build Mode:

- Tip: The Wall Tool is my favorite and works on its own or in conjunction with many of the other tools here. I most often use this and it’s counterpart in Fencing and Basements. It’s very flexible and works for whatever wall shape you’re drawing.
Room Tool
- Room Tool in Tutorial Video | see minute: 00:57
- Room Tool in Build Mode:

- Tip: The Room Tool is a convenient way to click-and-drag a square or rectangular room space. This has a handy counterpart in Fencing and Basements.
Build Ceiling or Floor
The floor and ceiling will normally self-create when the room is completed. If your floor or ceiling was somehow deleted, you can rebuild them as follows:
- Build Ceiling or Floor in Tutorial Video | see minute: 01:28
- Build Floor:
1. Click a wall on the room. The room should highlight.
2. If the floor is missing there will be a yellow rim around the floor.
3. Click the yellow rim and there will be a popup that says “Build Floor”.
4. Click the phrase “Build Floor” and the floor will be created by the game.

- Build Ceiling:
1. Click a wall on the room. The room should highlight.
2. Use the ▲ arrow to go up a floor/level.
3. If the ceiling is missing there will be a yellow rim around the ceiling of the room below.
4. Click the yellow rim and there will be a popup that says “Build Ceiling”.
5. Click the phrase “Build Ceiling” and the ceiling will be created by the game.

- Tip: If the room does not highlight when you click the wall, the game may not be seeing it as a room. To fix this please retrace the room. This usually fixes the issue. You can confirm by clicking a wall in the room and seeing if the room now highlights.
Remove Ceiling or Floor
If your design requires the removal of a floor or ceiling, following are ways to do so:
- Remove Floor:
Use the sledgehammer tool at the top of your screen to delete the floor. This action will delete the floor in the entire area that is considered to be in the same room as where you used the sledgehammer.

- Remove Ceiling:
Method #1:
1. Use the ▲ arrow to go up a floor/level.
2. Use the sledgehammer tool at the top of your screen to delete the ceiling. This action will delete the floor in the entire area that is considered to be in the same room as where you used the sledgehammer.

Method #2:
1. Click a wall on the room. The room should highlight.
2. Use the ▲ arrow to go up a floor/level.
3. You will see a yellow rim around the ceiling of the room below.
4. Click the yellow rim and there will be a popup that says “Remove Ceiling”.
5. Click the phrase “Remove Ceiling” and the ceiling will be deleted by the game.

- Tip: If the room does not highlight when you click the wall, the game may not be seeing it as a room. To fix this please retrace the room. This usually fixes the issue. You can confirm by clicking a wall in the room and seeing if the room now highlights.
Diagonal Room
- Diagonal Room in Tutorial Video | see minute: 02:20
- Diagonal Room in Build Mode:

- Tip: Diagonal rooms and roofs can be a bit challenging but they also add some interest and personality to a build. The Wall Tool can be used to draw diagonal walls also.
- Example of using a Diagonal room: (Click pic to view in gallery or download):

Delete Wall
- Delete Wall in Tutorial Video | see minute: 03:12
- Delete a wall or fence section by using the Wall Tool and holding the “Control” key to drag and delete wall/fencing. You will see an “X” on the small pop-up, and you will receive a $ refund for the deleted wall section:
(Note: The Sledgehammer Tool can also be used to delete walls, but it’s less precise.)

Custom Basement
- Custom Basement Tool in Tutorial Video | see minute: 03:34
- Custom Basement Tool in Build Mode:

- Tip: Trace a room, part, or all of your main level with this tool to create a basement area beneath it. Behaves much like the Wall Tool in that it’s very flexible and works for whatever shape of room or area you’re tracing.
Basement Tool
- Basement Tool in Tutorial Video | see minute: 04:20
- Basement Tool in Build Mode:

- Tip: Create a basement beneath your main level with this tool. Behaves much like the Room Tool as a convenient way to click-and-drag a square or rectangular basement space.
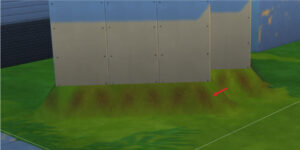
Basement & Foundation Tip
- If your home already has a foundation on it and you use the “Basement Tool” or “Custom Basement” Tool you will see this occur…
(The basement created this way will attach itself to the bottom of your main floor’s wall, pulling with it the edge of the ground next to the house, and will cover the foundation. See below:)

 Workaround…
There are several solutions to this issue:
1. Add the basement before you add the foundation.
2. Use the wall or room tool instead of one of the basement tools to create your basement.
3. Start outside the home footprint and then draw the wall in and drag the wall in after. (Tip from MapleSimmer)
4. Stay within the footprint (of the main floor). (Tip from MapleSimmer)
5. Lower the foundation, add the basement and then raise it. (Tip from MapleSimmer)
Wall Height
- Wall Height in Tutorial Video | see minute: 04:53
- Selecting wall height (Short Wall, Medium Wall, Tall Wall):
Click any wall on a level to highlight it. You will see a small icon for “Wall Height”. The height set for the level you’re on will be green, and the entire level will be that same wall height. (The default height is the “Short Wall”.)

Half Walls
- Half Walls in Tutorial Video | see minute: 05:35
- Half Walls in Build Mode:

- Half walls come in various heights. The two tallest half-walls on the right are only available on a level with the “Tall Wall“.
- Tip: Half walls have many creative uses, and the 2nd height is one of my favorite ways of treating a stairwell opening.
Friezes & Exterior Trim
- Friezes can be added at the top of a wall with no wall above it.
- Friezes in Build Mode:

- Exterior Trim can be added at the bottom of a second story or higher wall. It cannot be added on a first floor wall. Exterior trim is extremely useful for covering the raw seam on certain second story or higher areas like balconies.
Note: Exterior Trim will not allow itself to be attached above certain stair opening areas (including when they are against an outdoor wall). I will not enumerate, and have not noted, all of the nuances, and some may be fixed/altered in an upcoming patch, but let’s just say they can be a bit fidgety to deal with at this time.
Tip: I occasionally want to use an exterior trim at the edge of a roof, a patio, or for similar a purpose. Sometimes this can be done by creating a room on the floor above, adding the exterior trim, then using the Wall Tool to delete those new walls, and the trim you added will remain. I demonstrated this process here: https://sherigr.com/sims-4-building-tutorials/how-to-build-roofs/#flat - Exterior Trim in Build Mode:

- Example of using Exterior Trim: (Click pic to view in gallery or download):

Spandrels & Wall Sculptures
- Spandrels create an attractive finish on the openings of some types of porches, gazebos, etc.
- Spandrels in Build Mode:

- Wall Sculptures in Sims 4 can add wonderful detail to your exterior. Some of my favorite options are: an attic vent, wall vines, window boxes, corbels, awnings and balconies.
- Wall Sculptures in Build Mode:


- Example of using Spandrels & Wall Sculptures: (Click pic to view in gallery or download):
